

Starting back after the Christmas break we were given a project title called "deconstruction to Reconstruction"… On day one of the project we had to bring in a range of different clothes such as tailoring, evening wear, knitwear, sportswear and workwear, all collected from charity shops… The first task we had was to create a garment using a variety of different garments and arrange them in unconventional ways to create a new one. At first the task seemed daunting but I soon picked up the pace of recreating things with an irregular perspective to them. I found that a good starting point was to almost randomly throw a garment on to the mannequin and see were it takes me. To begin with I randomly placed a rugby shirt on the left shoulder of the mannequin and with a bit of tweaking realised it make an interesting shoulder piece. Luckily I had another rugby shirt so I intentionally placed the second shirt in the same position on the right shoulder, and naturally it made a perfect feminine neckline. Trying to create a complete outfit i started experimenting with different garments… The second experiment was with some blue velvet fabric, an detailed top and a petrel coloured scarf, because the last experimental design was fairly straight forward i decided to add more detail of my own to the piece. I created ruches by gathering fabric upwards and securing it with pins, the end result turned out looking flower-like.

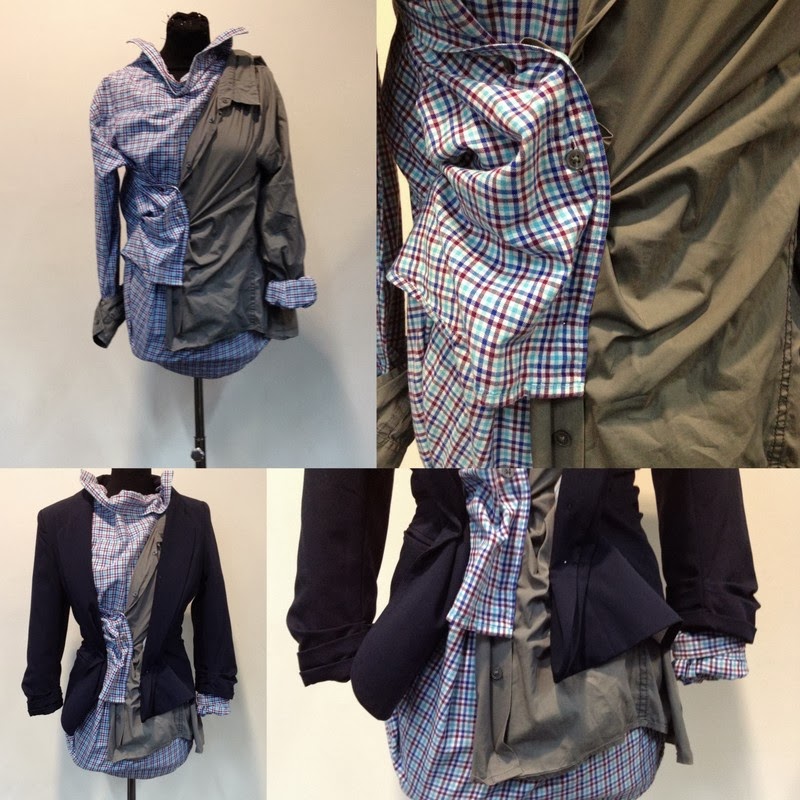
The third and fourth designs were my favourite, probably because I had gained more experience of working in this way. My third design comprises of a dark grey shirt worn upside down with the button panel folded to the left to create a new collar, I then attached a dark grey waistcoat to the waist line and added a few tucks/pleats to give the garment more detail. What I like about the garment overall is that the original detail in the original garments e.g. buttons, pockets, buckles and ties create new detail because of the way I've attached it to the mannequin. The last design I produced is made up of two mens shirts, the checked one is being worn backwards whilst the grey one is being worn the correct way. They are then joint together by the buttons, but they have been buttoned up alternatively to create a gathered detailing mainly in the centre and gradually widening, loosing less detail towards the exterior of the garment. I took a few pictured of the shirt modelled with a blazer to show how it could be worn as a fashion item as apposed to just a catwalk item. I am really satisfied with the outcomes of the last two experimental pieces, they remind me somewhat of Vivienne Westwood's work, rather than deconstructing the garment entirely, she gives the garment a whole new purpose.
Once we had finished using whole garments to recreate new ones, we were asked to dismantle each item by unpicking the seams, by doing this we could see the construction of each piece and the necessary patterns that create them. To the left is a photographic demonstration of the dismantling of a blazer. Seeing the garment as a flat plan really helped me to imagine how I could incorporate different aspects of the piece into other garments. Another positive to this task was being able to see the inside of the blazer and the reverse material that is used, it gave me an idea to reverse the clothing as well as reconstructing it in a completely different way.
Below are some examples of quick design ideas I had. I decided my ideas would be a lot more interesting and unconventional if I challenged my preconceptions of specific garments, for example; instead of aiming to create a dress or a top, I began to randomly place my cut up pieces of fabric to the mannequin and see where it led me. I found that starting around the neck area and slowly moving down to the shoulders is a great starting point to creating a garment… Below are some examples of draping neck pieces I came up with, that could easily be turned into a full article of clothing


Here you can see how my grey knitted neckpiece evolved from a high neck, frilled item to a tight fitting dress/top with pleats and ruches in flattering places. I have also recorded some detailing in the back of the garment for future reference - if i decide to actually make this garment wearable. I am pleased with this idea, because it looks almost finished and i have considered every aspect of the garment e.g. arm holes, neck line, back etc.. whereas in the other tasks i focused on making it look more interesting than wearable.

Still experimenting with ruches and gathers I have created a new design, but only using simple t-shirt material. The contrast between the washed out striped t-shirt and the bold dark blue creates some really strong patterns and detailing where they meet or cross over. I thought I was only making things for the top half of the body, so attempted adding in something for the bottom half, which is again just a plain white t-shirt. I wasn't overly pleased with the results so I added in some more detail, like a zip and a shirts cuff, the piece evolved nicely but didn't produce my best results.

It was time to start modelling the garments as they should be used, so with great difficulty I started to recreate some of the work i had produced on a mannequin on a friend of mine. The design ideas didn't always appear as good on the human model as they did on the mannequin but it helped me to readjust ideas I initially had in order for them to work. I also started to think about accessories, below you can see how I have used a unattached collar in two different ways; around the throat and wrapped around the wrist.

Lastly are my two most favourable outcomes of the unstitching to recreate task. The first image shows a blue pleated, waterfall like skirt made from a navy blue blazer with interesting blazer detailing in unusual places. The skirt is accompanied by two different styles of top, the first shows a grey knitted, turtle neck vest top with appropriate pleating to mirror the skirts details and a similarly styled shirt with a billowed appearance. The shirt was placed carelessly on the mannequin to begin with so that no one would steal it while I was out on lunch, but it accidentally turned into a useful mistake. The second design you can see, is a development of the grey dress I produced previously, it shows more detailing and an improvement of materials, I have also incorporated shirt lapels, cuffs and buttons to give it more character.


